Go Out: Look Up!
A Guide to the Sky, Telescopes, and Telescope Programs
![]()
![]()
![]()
Go Out: Look Up!A Guide to the Sky, Telescopes, and Telescope Programs
|
|
|
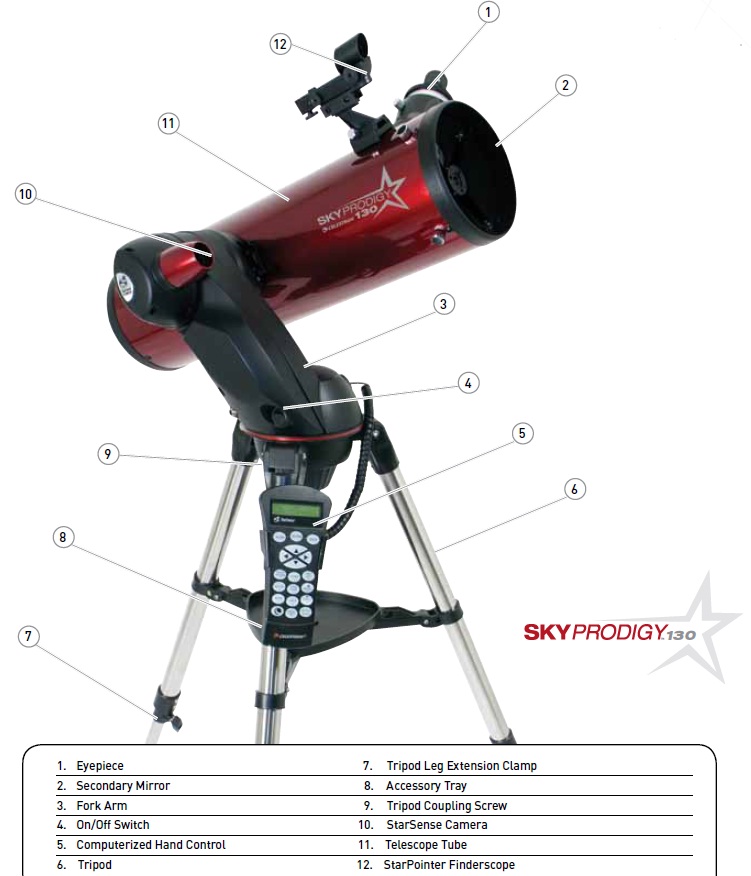
How to Observe with a SkyProdigy 130Documents
What follows is cheat sheet for using a Celestron SkyProdigy 130 as equipped for Curie Elementary. NEVER LOOK AT THE SUN. EVER. Do a little PrepIn general, it helps to know, before you head outside, what your targets are going to be. With the SkyProdigy, however, you can step outside completely ignorant of the sky, because the computer takes care of just about everything for you. Note: using this telescope is menu-intensive. It helps to practice this prior to having a bunch of kids lined up behind the eyepiece. An hour spent outside with scope the night before you take it out with an audience will make a big difference. Try it nearby, before heading out to a dark sight. Fresh batteries (8 D-cells) or a charged power pack are critical to using this scope. No power = no pointing the scope = no observing. Unpacking and Setting Up the ScopeNote: Don't assume the power pack is charged. The first thing you should do when unpacking is charge the power pack. Note: the power adapter cord is a little flaky: make sure the Charge light stays on when charging. Generic SkyProdigy 130: Included in with the scope is the Sky Prodigy 130 Quick Set-up Guide. It provides a very nice step-by-step for setting up and aligning the scope.
Once assembled, be care when carrying it around. There is a lot of weight at the top of the tripod. It's top-heavy. Try hard not to knock it over.
Preparing to observeFind a safe, stable place to set up the scope (tips).Assembling the ScopeSee the Assembly Guide
Aligning the scope
Remove the SkySense Camera Cover (place in case).Remove the End Cap (place in case).
Starting Up and AligningBeware of Cord Wrap! The scope starts out and spins about a full revolution to the right. The cord plug spins with it, dragging the cord with it. If the cord is tight before it starts to spin, bad things can happen (I've had cords break on other scopes). The hand controller cord also can get wrapped. Keep and eye out for "cord wrap". Hitting any of the direction arrow buttons will stop the scope moving (known as "slewing"). You can also turn off the scope or unplug the power.
Note: the sky has to be dark, but does not have to be very dark. It takes about three or four minutes to fully align itself (there will be an "Alignment Success" message). ObservingOnce you get the Alignment Success message, you are ready to observe. Hitting the Tour button will take you on a tour of objects. It seems to take you on a sequence and you can't get out of the sequence. You can hit Enter and Back. Enter takes you to an object. Back and then Enter gets you to the next object. I don't know of a way to "Skip" to the next object on the tour without slewing to it first. Object Information is available in the Hand Controller Display. Note: to "fine adjust" where the scope points (to center an object), you can use the Arrow buttons. Note also: you will want to set the Motor Speed to 4 or 5 (9 is very fast and will move completely off an object very fast). To change "slew rate," click Motor Speed and then a button with a number between 1 and 9. The Solar System, Stars, and Deep Sky buttons allow you to select from a list of these types of objects. Hitting Enter sends the scope there. The Deep Sky menu is broken down by Target Types. Once in a type, it's okay to hit Enter on anything, Moon Filter
Packing UpTake the End Cap out of the case, put it back on the scope.Put the Eyepiece in its case. Put the eyepiece cap back on the focuser.Put the cap back on the SkySense Camera. Turn off the StarPointer finder. Put the Finder in the bag. Turn off anything that was powered on.Dissemble the Scope, Mount and Tripod in the reverse order of its Assembly. Place in storage cases. Look around with a flashlight for any dropped items (like caps and cases).
|
|
Questions or comments? Email:Jeff Martin |