Go Out: Look Up!
A Guide to the Sky, Telescopes, and Telescope Programs
![]()
![]()
![]()
![]()
![]()
![]()
![]()
![]()
![]()
Go Out: Look Up!A Guide to the Sky, Telescopes, and Telescope Programs
|
|
|
How to use a FinderWhy? How? Why do we need a finder scope?The big reason is to find and center targets. High magnification = small area. A finderscope has low power and a wide field of view.
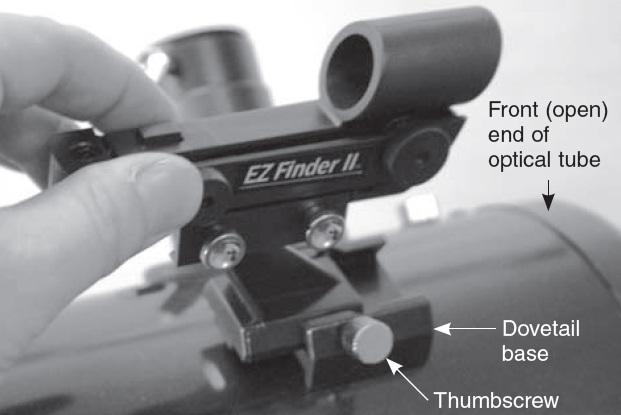
There are two different types of finderscopes: "red-dot finders" and small finder telescopes. Red dot finders project a red dot or pattern onto a plate of glass or plastic. Moving the scope moves the red dot through the sky. Simply move the red dot onto your target and you should be able to see your target through a wide angle eyepiece. Advantages: easy to see the dot over a wide range of sky (wide field of view); they do not reverse the image like some finder telescopes do. Disadvantages: requires a battery (it's easy to leave the finder on, draining the battery); it doesn't brighten stars like a finder telescope does. Finder telescopes are very precise, brighten the guide stars, and often make dim targets visible in the finder. They have a smaller field of view, so you must point your telescope more precisely on your target so that it falls within the view of the finder. Most finder telescopes reverse the image so that you must move the scope in a direction different than if the finder did not reverse the image. Mounting and dismounting a finder
How do we use a finder
How do we align a finder?In order to be useful, the finder must be pointed in the same direction as the telescope. Aligning a finder is most easily accomplished in the day time, but a similar technique can be used at night. With a low-power (wide angle) eyepiece in the scope, point the scope at something along the horizon (nowhere near the sun). Something where the orientation in the eyepiece is easily recognizable. Center your target object in the scope's field of view. Look through the finder. The cross hairs or the red dot should be on the target. If not you'll need to adjust the finder's alignment. There are screws that can be turned to fine tune where the finder points. Make sure the finder is set securely in the finder base. There are generally two adjustment screws: one for azimuth (left-right); one for altitude (up-down). Twist one. If the red dot/crosshair gets closer to the target, you're adjusting the right way. If not, reverse. Center the finder along the one axis. Repeat the steps for the other axis. There is a video for Red-Dot finders at the bottom of the Orion EZ Finder II page.
|
|
Questions or comments? Email:Jeff Martin |